Uploading Final Cut Pro Projects
Final Cut Pro project assets have a different structure than media assets. When you upload
a Final Cut Pro project to Final Cut Server, the Final Cut Pro project file is the primary
representation for the asset. Final Cut Server discovers the video and other media files
that are linked to the Final Cut Pro project and uploads each of the media files as a unique
media asset. Final Cut Server then lists each of the project’s linked media files as an element
of the Final Cut Pro project.
Note: If your Final Cut Server administrator has turned on Edit Proxy file creation, an Edit
Proxy will also be created for every video file that is linked to the Final Cut Pro project.
This Edit Proxy is used for checking out Final Cut Pro projects for editing. For more
information about the Edit Proxy feature, talk to your Final Cut Server administrator.
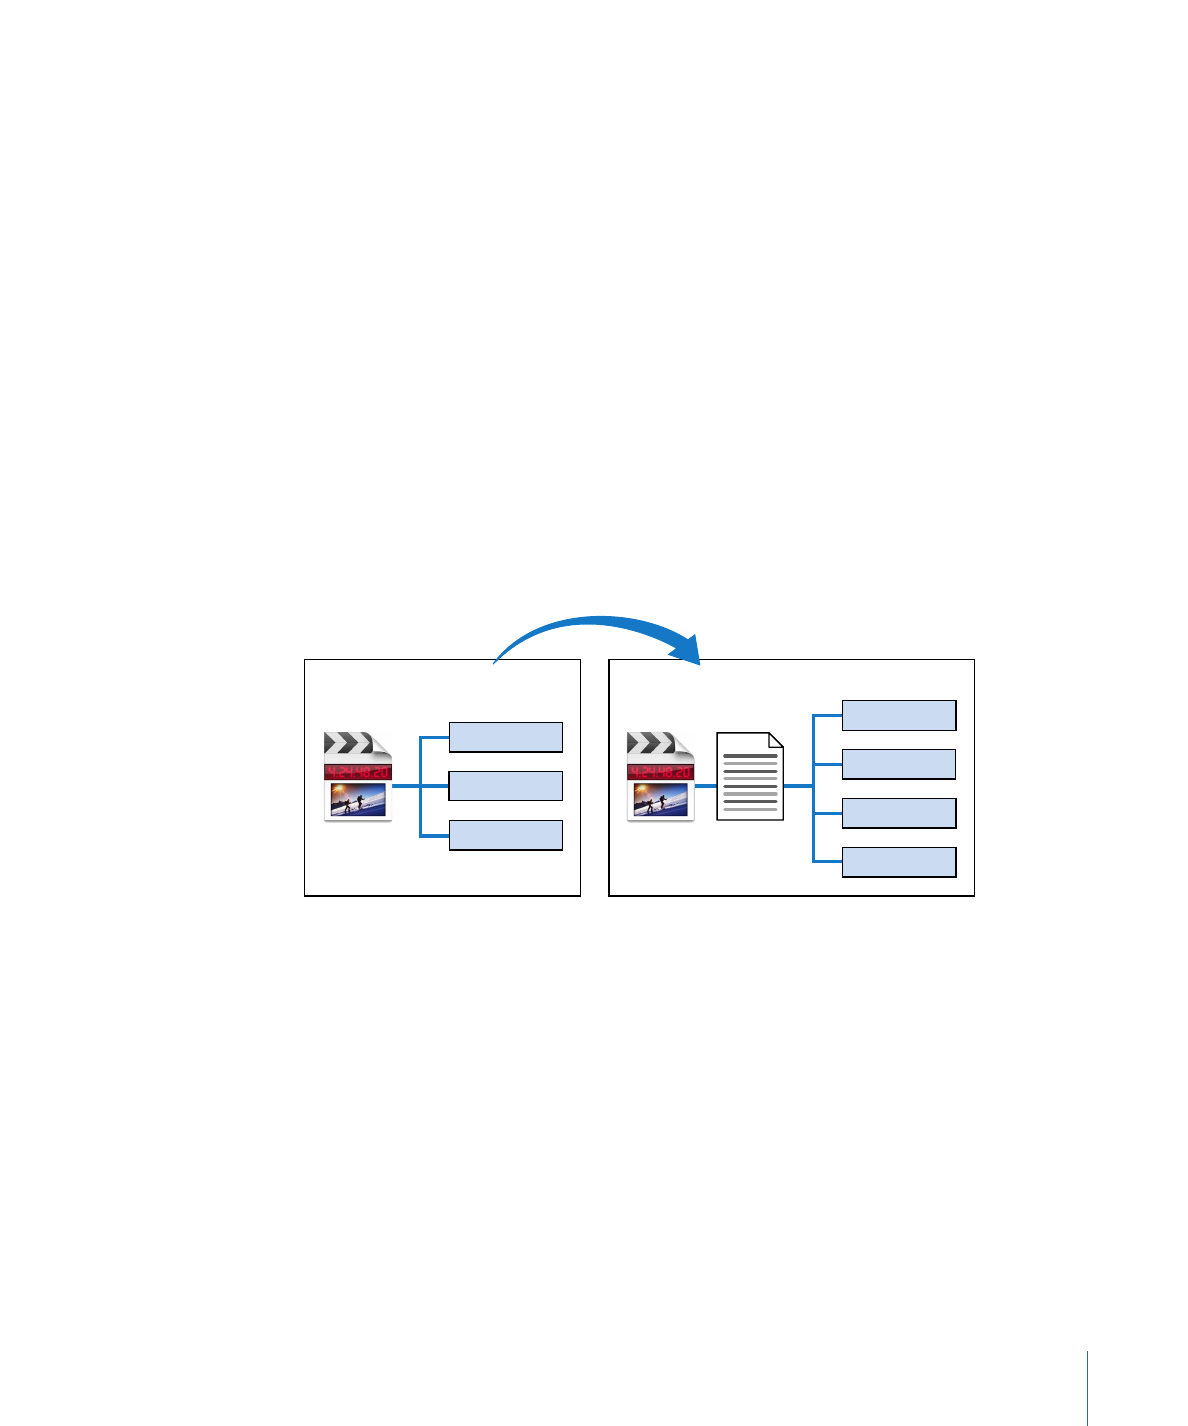
The illustration below shows a Final Cut Pro project at upload. Notice that the elements
list is inside the asset, but the media assets that the elements list references are
independent media assets. Any of the media assets can be found by double-clicking the
element in the Elements pane; when you do this, the media asset’s info window opens.
Project asset
Final Cut Pro project
Upload Final Cut Pro project to Final Cut Server
List of linked
media elements
.mov
.jpeg
.aif
.mov
.jpeg
.aif
Clip Proxy
37
Chapter 3
Uploading Files to Final Cut Server
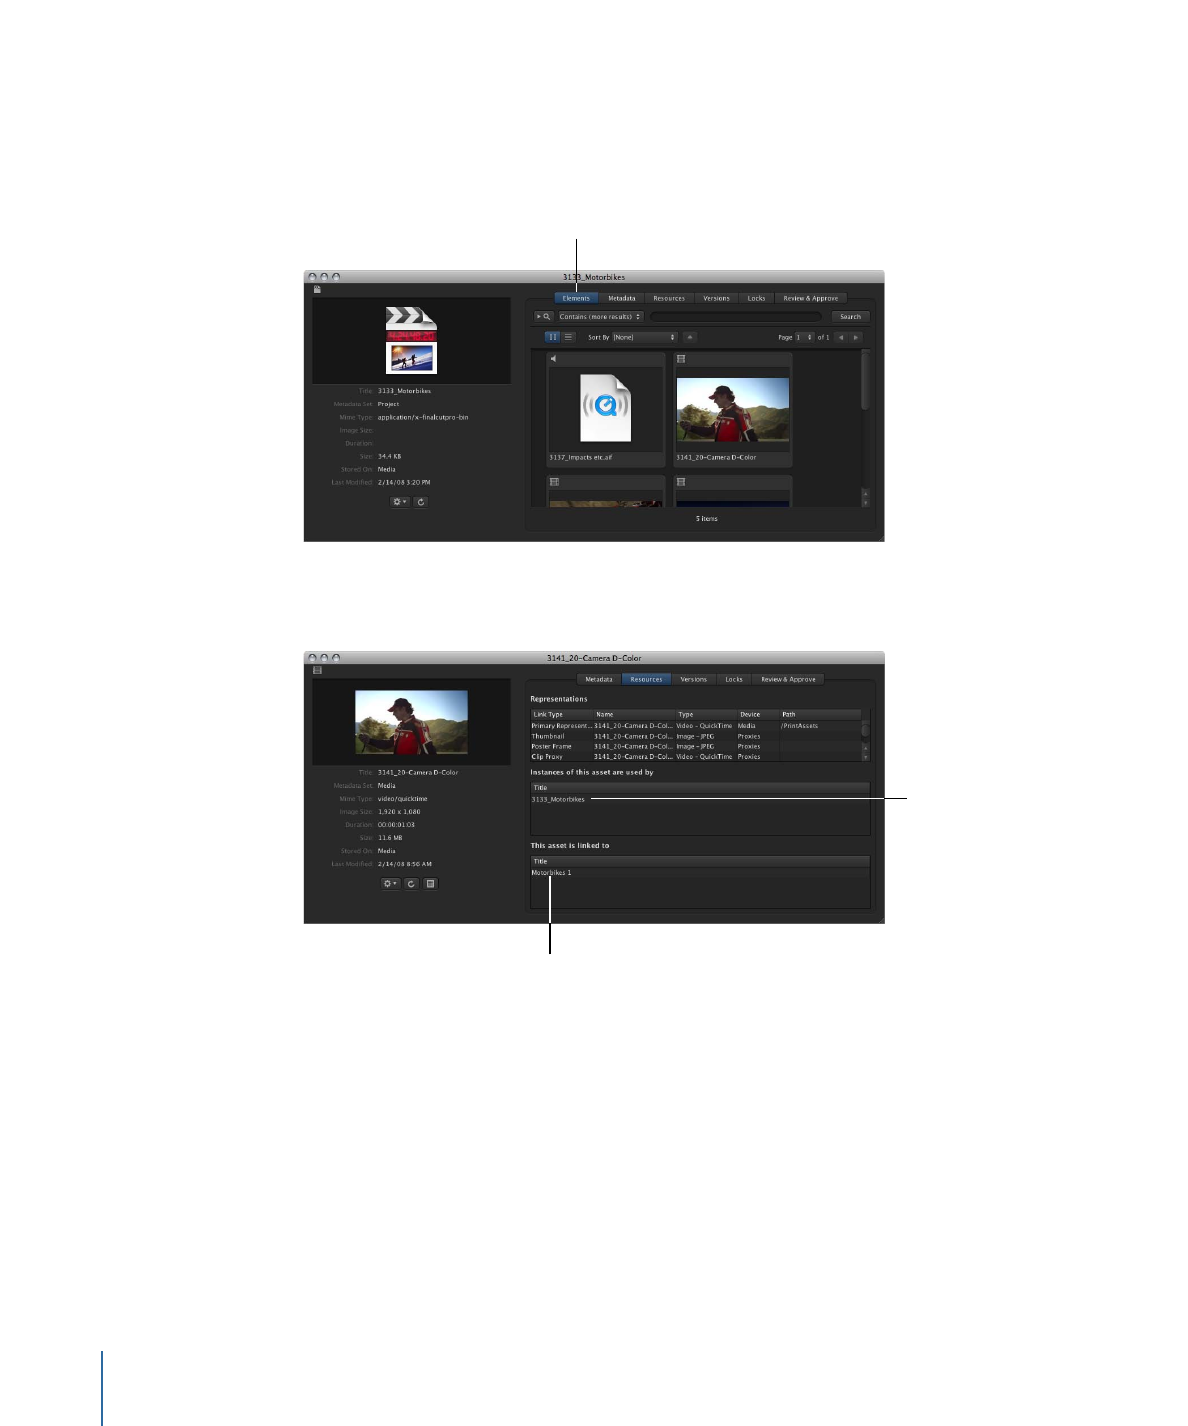
After a Final Cut Pro project has been uploaded, you can get information about the
project’s linked media files in the Elements pane of the Final Cut Pro project’s asset info
window.
The linked media is
shown in the asset info
window’s Elements pane.
Alternately, you can look at the Resources pane of a media asset’s info window to see if
a media asset is linked to a Final Cut Pro project.
An instance of this
media asset is used in
the Final Cut Pro project
titled “3133_Motorbikes.”
The production
“Motorbikes1” includes
this media file.
38
Chapter 3
Uploading Files to Final Cut Server
Considerations When Uploading Final Cut Pro Projects
Keep the following things in mind when uploading Final Cut Pro projects:
• Uploading a Final Cut Pro project that contains a SmoothCam filter: If you upload a
Final Cut Pro project that uses the SmoothCam filter, the analyze file created from it
is not uploaded to Final Cut Server. When you check out the project asset from
Final Cut Server for editing, Final Cut Pro automatically re-analyzes the SmoothCam
filter to re-create the project’s analyze file. This analyze process could take some time.
• Uploading a Final Cut Pro project that contains render files: If you upload a Final Cut Pro
project that contains render files, the render files are not uploaded to Final Cut Server.
After checking out or exporting a Final Cut Pro project, you will need to rerender the
files in Final Cut Pro.
• Uploading a Final Cut Pro project that uses a Motion master template: It is recommended
that you upload Final Cut Pro projects that contain a Motion master template only to
edit-in-place devices.
• Include file extensions on all files uploaded to Final Cut Server: It is recommended that
you include file extensions on all files uploaded to Final Cut Server.
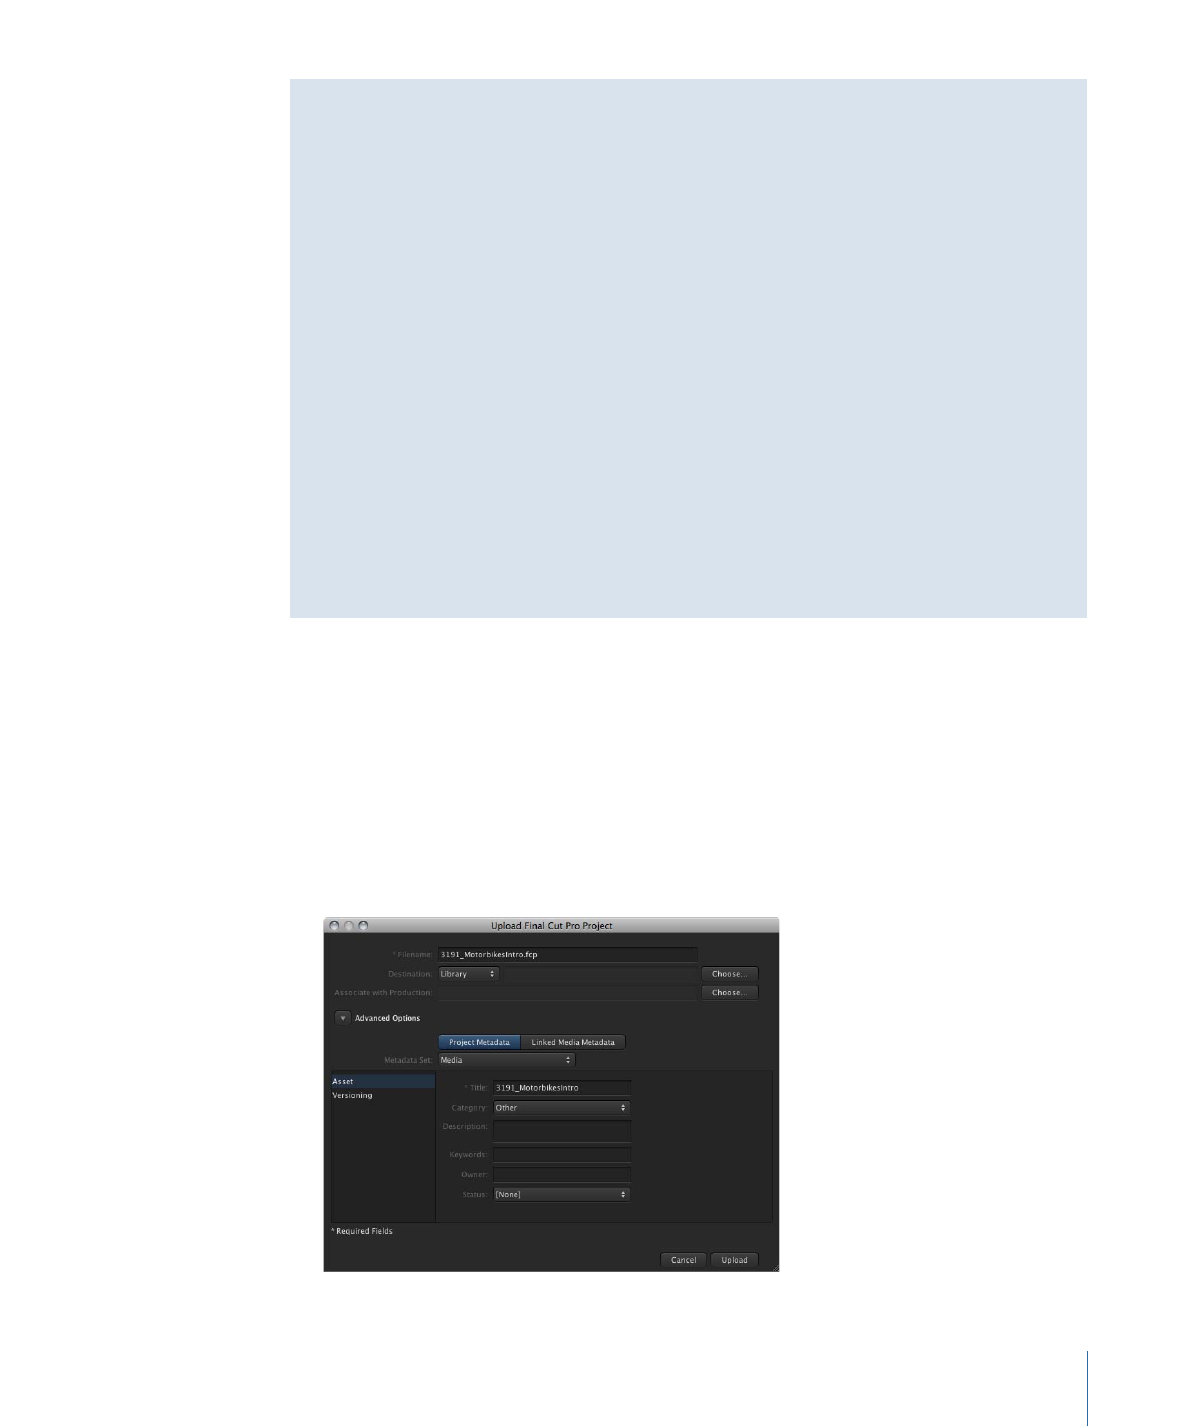
To upload a Final Cut Pro project file
1
Do one of the following:
• Drag the Final Cut Pro project file to the column on the left of the Final Cut Server main
window, to the Assets pane, or to a production in the Productions pane.
• Choose Upload File from the Server pop-up menu (the pop-up menu in the
Final Cut Server main window that appears when you click the Server button), select
the Final Cut Pro project file in the file browser that appears, then click Upload.
The Upload Final Cut Pro Project window appears.
39
Chapter 3
Uploading Files to Final Cut Server

2
Some of the information in the Link Final Cut Pro Upload window is automatically entered.
You can change the metadata set and add any metadata for the new Final Cut Pro project
and the linked media.
Important:
Any metadata you enter for the project asset will be applied to the new project
asset and to each asset being created for the linked media files.
3
If necessary, choose a new destination device from the Destination pop-up menu.
This specifies the device on which the file will be stored. If you have questions about
which device to choose, contact your Final Cut Server administrator.
Note: Media and Library are the primary Final Cut Server devices. Talk with your
Final Cut Server administrator about which other configured devices are appropriate for
media file storage.
4
If you want to group the Final Cut Pro project asset in a production, click Choose at the
right of the Associate with Production field and specify a production.
See
Organizing Assets in Final Cut Server
for more information about productions, including
creating a new production.
5
Click Upload.
The upload begins. The upload progress is displayed above the Information pane in the
bottom-left corner of the Final Cut Server main window.
6
To monitor the progress of the file upload, click the Downloads and Uploads button to
display the Downloads & Uploads window.
7
After the file is uploaded, click the “Assets created by me” Smart Search listed under the
My Smart Search heading to view the new asset or assets that you just uploaded.
For information about how to get information about the Final Cut Pro project asset that
was just created, see
About the Asset Info Window
.